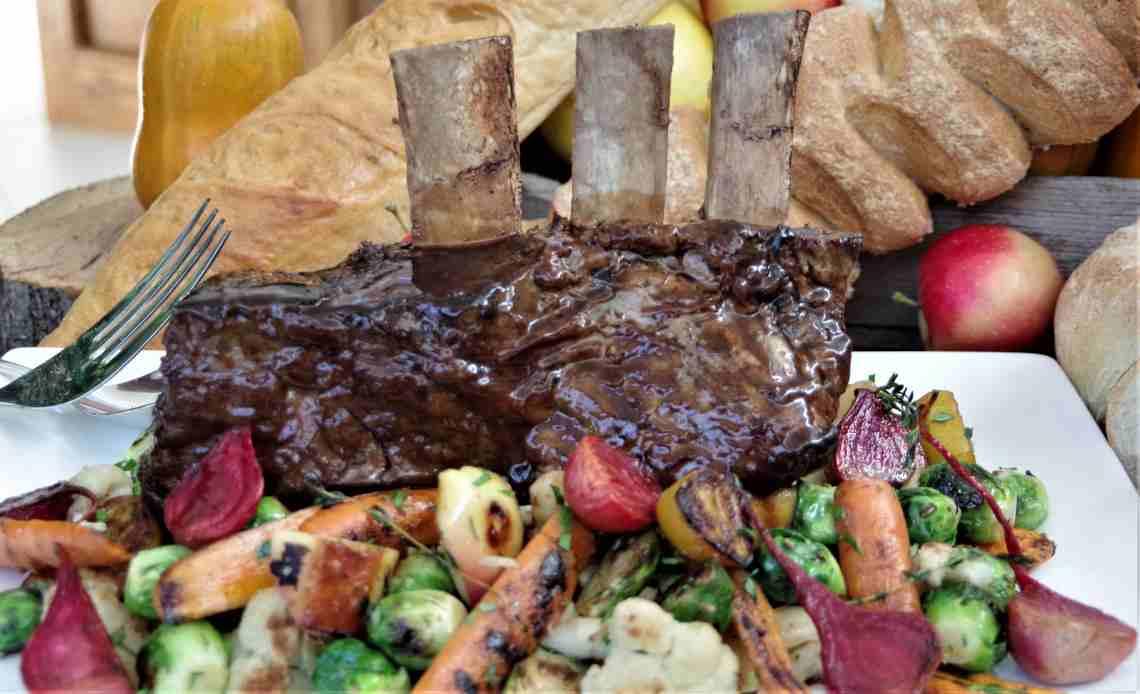
Pinot Noir Braised Beef Short rib
with Glazed Vegetables and Pain Rustique by Scott Royce, Karin Devaux and John Schneeberger
Why this recipe works:
This dish is perfect for cozy evenings by the fire. It’s all about when fall is turning to winter.

Glazed vegetables can easily be adjusted with whatever is on hand. Though this dish is prep heavy, much can be done the night before. It’s guaranteed to wow your guests with how you brought it all together.
Pinot Noir Braised Beef Short rib
Yield: 4 – 6 portions [depending on portion size]
Ingredients:
1 PC Whole beef Short Rib
500 ML Pinot Noir
2 L Quality beef stock
2 Onions
2 Medium Carrots
-
Celery stalk
-
Sachet [2 bay leaf, 1 Tbsp peppercorn, 3-5 thyme sprigs, butchers twine, cheesecloth or coffee filter]
as needed Salt and pepper
as needed all purpose flour for dredging (optional)
as needed vegetable oil
Preparation:
Day 1:
Using a sharp boning knife, remove the meat from between the bones to expose approximately 2” from the top of each bone; “french” [scrape] the exposed bones to remove as much of the meat, fat and sinew as possible.
Dice the “mirepoix” [onions, carrots and celery] into medium sized pieces. Prepare the “sachet” by wrapping the bay leaf, peppercorns and thyme sprigs in cheesecloth or a coffee filter and tying with some butchers twine
Season the short rib generously with salt and pepper. Dredge in flour, if using, patting off excess. Heat a heavy pan thoroughly and preheat the oven to 325°C. Add a thin layer of vegetable oil to the pan and sear the meat over medium-high heat on all sides to achieve a deep golden brown.
Remove the meat from the pan and place into an ovenproof baking dish that is deep enough to cover the meat completely.
In the same pan, adding or draining off oil as necessary, add the mirepoix and cook over medium-high heat until browned; then add the mirepoix to the baking dish with the meat. Add the Pinot Noir to the pan, using a wooden spoon to scrape up any brown bits from the bottom. Bring to a boil and reduce by 1/3; add to the baking dish with the meat along with the hot beef stock and the sachet.
Cover and braise in the oven for approximately 3 hours or until the meat is very tender.
Remove the baking dish from the oven and uncover. Allow to cool and then refrigerate overnight in the liquid.
Day 2:
Remove the meat from the pan. Heat the cooking liquid and strain out the mirepoix and sachet. In a saucepot on the stove over medium-high heat, bring the braising liquid to a boil, skimming off any fat. Simmer and reduce the braising liquid by about ½ or until desired thickness is achieved.
Adjust the seasoning with salt and pepper, adding a little lemon juice if the sauce tastes “flat”.
Reheat the meat in the oven in the covered baking dish until thoroughly hot. Serve with the glazed vegetables.
Glazed Vegetables
Yield: 4-6 portions
Ingredients:
½ small head Cauliflower [cut into florets]
3 pieces Carrots [choose slender carrots, cut in half lengthwise]
1 medium Parsnip [cut into halves or quarters lengthwise]
20 pcs Brussel sprouts [cut in half if large)
4-5 pieces Baby beets [simmered in water, peeled and quartered]
125 ML Chicken or vegetable stock [home made]
3 Tbsp Butter [cold]
1 tsp Honey
1 bunch Parsley chiffonade
as needed Vegetable oil
as needed Salt and pepper
Preparation:
Wash, peel and trim all vegetables. Cut them in similar sizes. In a cast iron pan, cook the vegetables in small batches, using vegetable oil, seasoning lightly with salt and pepper. Once the vegetables are 75% cooked and lightly browned, remove them from the pan and arrange on a baking sheet. This can be done the hour before your guests arrive for dinner.
Re-heat the vegetables in a 350° oven 20 minutes before you intend to serve. In the meantime, place the chicken stock into a small saucepot and reduce by half at medium heat. Once reduced, swirl in the butter. Toss the vegetables in the sauce, adjust seasoning with salt and pepper if necessary (be sure to taste!), add the parsley and serve.
Pain Rustique:
Why the recipe works:
This bread is about tradition. Four ingredients – flour, water, yeast, and salt, built and baked in the old school way. Care and passion in the development of flavour, crumb and crust make this bread magical. Crispy and chewy crust with a delicate, tender centre and what flavour. Serves well with… everything
Pain Rustique
4 x 1 ½ lb. Boules (loaves)
Poolish (starter)
1 lb + 7 oz. Bread Flour
1 lb + 7 oz. Water (warm)
2 tsp Yeast (dry active)
-
Mix dry active yeast into warm water and allow to sit for 5 minutes.
-
Add in flour and stir to combine into a thin batter. Place in large container. Wrap well and allow to develop at room temperature for 12 – 16 hours
Dough
1 lb + 7 oz. Bread flour
10 oz. Water
All Poolish
1 oz. Salt
½ oz. Yeast (dry active)
-
In one bowl mix flour and salt. In a separate bowl mix water & yeast together. Add both bowls to the poolish.
-
Using the dough hook attachment of a mixer, knead until dough is satiny smooth and elastic (approximately 5 – 7 minutes at medium speed)
-
Remove dough from mixing bowl. Place on a floured surface, flor the top of the dough and cover with plastic. Allow to rest 1 hour.
-
Remove plastic, punch dough after an hour, recover with plastic and allow to rest a further 30 minutes.
-
Remove plastic and divide the dough into 4 – 1 ½ lb pieces. Shape each piece into balls.
-
Flour the top of the balls and cover with plastic. Allow dough to rest for 1 hour.
-
Place the balls on a parchment lined baking sheet, cover with plastic and allow to rise until double in size. Approximately 1 hour.
-
Place the risen dough balls in an oven that has been pre-heated to 475°F
-
Bake for 12 minute with steam* for the first 5 minutes.
-
Reduce temperature to 400°F for 12 minutes more.
-
Remove finished bread balls (Boules) and allow to cool.
-
Enjoy
* To effectively create steam in the oven you can apply three spritzes of water on the inside wall each minute for the first 4 minutes. This will allow the water to turn instantly to steam and keep your bread from forming a crust until later in the baking process.